
Color Swatches App (English)


Once installed and setup, the Color Swatches app will allow users of your site to select the color of a product based on representative swatch images you've uploaded. So if you have product with color options like Red, Blue, or Leopard Print, you can upload images (or set a solid color) for each that shows the customer a swatch of that color/pattern on the product's details page. When a swatch is clicked on, the color option is updated and eCom performs the standard functionality that normally occurs on color selection (i.e. pricing, stock, product image gallery info update).
Follow instructions in Lightspeed eCom to purchase the Color Swatches app from the App Marketplace. During install, you'll be forwarded to our app management site to either login to an existing account (if you've purchased a Lightspeed eCom app from us before) OR create a new account with us to install and manage this and any future apps you may purchase from us for Lightspeed eCom.
Once you've created an account or logged into your existing account, the app installs automatically, after which you'll be forwarded to the shops list, which displays a list of Lightspeed eCom shops registered with your account and any apps installed with those shops.
For the Color Swatches app to function, the Catalog Clone app is installed at the same time. Catalog Clone app is needed to clone (and keep in sync with) your eCom catalog into our app framework (so your catalog can be available to the Color Swatches app in the app admin). Before you start working in the Color Swatches app, you'll want to perform the initial sync in the Catalog Clone app to pull your current catalog of products into your AdVision app account. To do this, click on the "Catalog Clone" app link, and then click the button "Import/Full Sync Catalog". Be sure to leave your browser window open and computer on while the import runs.
Once you've imported your catalog into your AdVision app account, you can now begin working in the Color Swatch app.
WARNING: Be sure to assign your image files unique filenames before uploading. If you use duplicate filenames, those files will overwrite each other. For example: If you upload "image-1.jpg" to Product A, and then a different file with the same filename of "image-1.jpg" to Product B, the second upload will overwrite the file from the first upload, which will cause Product A and Product B to use the same image file.
Check out our video tutorial!
To manage this app, click on it's name "Color Swatches" under the appropriate shop. This will take you to the products listing view showing any products the Catalog Clone app has imported from eCom.
Each product in your catalog will show in this view, and with each product you can see the following info:
- ID - in AdVision app system
- eCom ID - the product's ID in eCom
- Title
- URL - path to the product in your eCom webstore
- Visibility - whether or not the product is set to show in your eCom webstore
- Has Swatches - indicates if you've uploaded any swatches for the product in the app yet
Now we can start setting up swatches. First, find a product that you know has a color option in your catalog. You can do this by either browsing through the list of products or by using the keyword search at the top. Once you locate the product you want to work with, click on it's title to manage it's swatches.
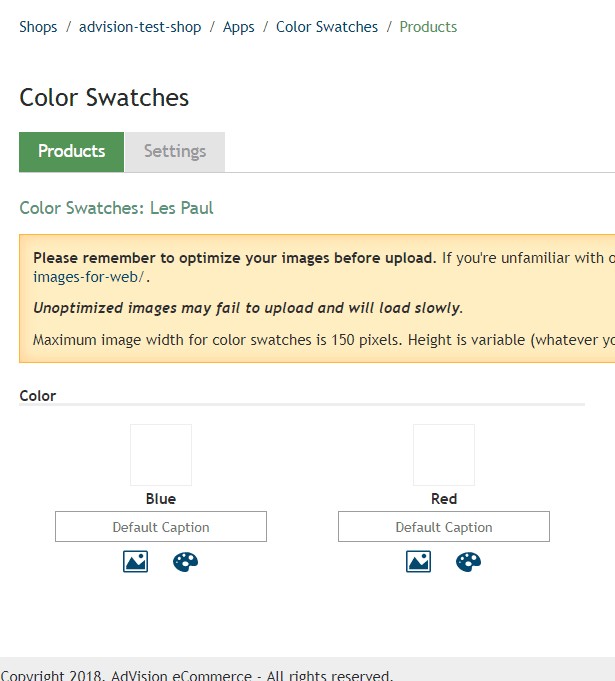
If the product you've selected has any variants (e.g. Color, Size) setup for it in eCom, you'll see them listed on the page that loads. With each variant, you'll see it's title (e.g. Color), under which will be listed any options within that variant. For example, variant options for Color might Red, Blue, and Green; for each variant option there will be a thumbnail displayed that shows:
- A box that will show the option's image or color swatch, once you've set it
- The option's title (e.g. Blue)
- A default caption field, which you can set to determine the value that will be used for the option's image's ALT and TITLE attributes. If you leave this blank, the option's title (e.g. Blue) will be used for ALT and TITLE. Not familiar with ALT and TITLE? Please check out https://yoast.com/image-seo-alt-tag-and-title-tag-optimization/
- Below the default caption field are two icons, the image icon and the color palette icon. The image icon (left) is used to upload an image for the option's swatch. The color palette icon (right) is if you choose to set a solid color for the option's swatch instead of using an image.
Selecting a Color for Swatch
If a solid color is sufficient for an option's swatch, you can use the color picker to find and set a simple, solid color to represent the option. Using a solid color allows the swatch to load faster for your customers (solid colors load faster than images) and allows you to avoid having to prepare an image. To use the color picker, click the color palette icon under the option you want to work with, use the color picker tool to find and select your color and then click the "Choose" button. This will set the options color and display the color in the options thumbnail swatch.
Uploading an Image for the Swatch
If you need something more detailed than a solid color display for the swatch, you can prepare and upload an image to be used. Before uploading the image, you must first prepare it.
At the top of the page you’ll see a message titled “Please remember to optimize your images before upload”. This outlines the requirements for a swatch image. Each swatch image you plan to use should be:
- A maximum of 150 pixels wide
- 72 DPI
- Optimized for the web. If you’re unfamiliar with optimizing images for the web, please check out https://www.abetterlemonadestand.com/optimizing-images-for-web/ Failure to optimize an image before upload may result in the image failing to upload into the app, and will result in slower load times for your customers when loading the swatch images.
- Height of the image can be whatever you want, but the height should be uniform for all swatch images.
Once you’ve prepared your swatch images as necessary, click on the image icon under the option you want to upload an image to. This will produce the file selection dialog box from your operating system so you can locate the file you’ve prepared and want to use. Once you find the file, select it (double click or click on it and then click “Open” or “Select”).The image will upload immediately for the swatch and you see a thumbnail of the image display above the option’s title.
Once you’ve completed setting all the swatches for a product, visit the product’s page in your eCom webstore. By default, any swatches you’ve set will show below the variant’s select menu. Note that if you don’t set a color or image swatch to all options within a variant, any options that were neglected will show their title in place of a color or image swatch. To fix this, be sure to set an image or color swatch for every option in a variant that you’re going to use swatches for.
Now that you’ve seen how to setup swatches for a product, click on the Settings tab to see the fields you can adjust. Under settings, you can control the following:
- Swatch Width - This will determine how wide the color and image swatches will display on a product's page. You can enter as a pixel value (e.g. 50px - this is the recommended method), a percentage (e.g. 80%), an em value (e.g. 3em), or with a pt value (e.g. 48pt). What to know about these sizing units? Check out https://www.w3.org/Style/Examples/007/units.en.html. The default width is 30px, maximum width 150px.
- Image Swatch Height - Determine the how tall the image swatches will display on product pages. The default image swatch height is 30.
- Color Swatch Height - Determine the how tall the color swatches will display on product pages. The default color swatch height is 30.
- Split on Dash - This is for advanced use only. AdVision will recommend under certain circumstances.
If you make any changes to any of these fields, be sure to click "Save Settings" button to save those changes.
